One of the ways the Admin Portal saves time for community administrators is by supporting bulk upload and management of member data as a .CSV file spreadsheet. The primary program most people use to open and edit .CSV files is Microsoft Excel on Windows and the Numbers app on Mac.
Depending on your computer operating system and country, Microsoft Excel uses different formats for .CSV files, which may cause upload issues when using Raftr templates for member data.
By default, all spreadsheet files downloaded from Raftr use commas (,) as data delimiters/separators. However, some systems use semicolons (;). Before uploading member data to Raftr's Import Wizard, you will need to confirm that your file is using the correct comma (,) delimiters.
The easiest way to do that is to open the file. If each column title is in its own column, then your delimiters are correct. You can proceed, making sure you are following the formatting rules for upload data.
If you are having trouble uploading spreadsheets to the Admin Portal, check these troubleshooting steps based on your operating system and software version.
- Windows - Microsoft Excel 2010, Microsoft Excel 2014, or Microsoft Excel 2016
- Window - Microsoft Excel 2019 and Newer
- Mac - Numbers app, all versions
- All systems - Formatting Rules
Using Windows and Microsoft Excel 2010, Microsoft Excel 2014, or Microsoft Excel 2016 to Upload Files
If the computer you are using to upload data is a Windows device and you are using Excel 2010, Excel 2014, or Excel 2016, use the following instructions to confirm your .CSV delimiters and avoid upload issues on Raftr.
NOTE: We can't guarantee compatibility with versions of Excel older than 2010.
- Open a new Excel sheet.

- Select the Data tab on the header.
- Choose From Text.

- Select the template file you downloaded from Raftr. Examples are:
- example_data_and_column_explanations
- import_template
- batch_add_tags_template
- On Step 1 of the Text Import Wizard, select Delimited as the Data Type
- Confirm that the File Origin from the dropdown is Unicode UTF-8
- Select Next.

- On Step 2 of the Text Import Wizard, check the box next to Comma in the Delimiters section. (You can check that this is correct in the preview image, which will show the columns properly separated.)

- Select Finish (you can skip step 3). You should now be able to edit the data in the rows and columns.
- When adding or updating data, be sure to follow the format rules to avoid upload issues
- After filling out your data, export the .CSV in the same format by selecting File, then choosing Save As from the menu.
- Choose a destination where you would like to save your file. You can also update the name (optional).
- Select the dropdown arrow next to Save as type.
- Choose CSV UTF-8 (comma limited) (*.csv) as your file type.
- Return to the Import Wizard on the Raftr Admin Portal and upload your new file.

Using Windows and Microsoft Excel 2019 and Newer to Open Files
If the computer you are using to upload data is a Windows device and you are using a version of Microsoft Excel from 2019 or later (including the Subscription 365 product), use the following instructions to confirm your .CSV delimiters and avoid upload issues on Raftr.
- Open a new Excel sheet.

- Select the Data tab on the header.
- Choose From Text.

- Select the template file you downloaded from Raftr. Examples are:
- example_data_and_column_explanations
- import_template
- batch_add_tags_template
- You will be able to preview the spreadsheet table in a pop-up window. Confirm that your File Origin is Unicode (UTF-8). If the spreadsheet preview is not formatted correctly, change the delimiter to Comma.

- Select Load. You should now be able to edit the data in the rows and columns.

- When adding or updating data, be sure to follow the format rules to avoid upload issues.
- After filling out your data, export the .CSV in the same format by selecting File, then choosing Save As from the menu.

- Select the dropdown and choose a destination where you would like to save your file. You can also update the name (optional).
- Select the dropdown arrow next to Save as type.
- Choose CSV UTF-8 (comma limited) (*.csv) as your file type if it is not already.

- Return to the Import Wizard on the Raftr Admin Portal and upload your new file.
Using Mac to Upload Files
If the computer you are using to upload data is a Mac device, use the following instructions to confirm your .CSV delimiters and avoid upload issues on Raftr.
- Open the Numbers app.

- Select the template file you downloaded from Raftr and select Open. Examples of file names are:
- example_data_and_column_explanations
- import_template
- batch_add_tags_template

- To add additional rows, select the arrow next to the first line and choose Add Row Below from the dropdown menu.

- Repeat step 3 until you have added all your data.
- Delete any empty rows.
- When adding or updating data, be sure to follow the format rules to avoid upload issues.
- After filling out your data, export the CSV in the same format by selecting File, choosing Export To from the dropdown menu, then selecting CSV.

- In the next window, open the dropdown menu next to Advanced Options and choose Unicode (UTF-8).

- Select Next to continue, and choose a destination for your new file.
- Return to the Import Wizard on the Raftr Admin Portal and upload your new file.
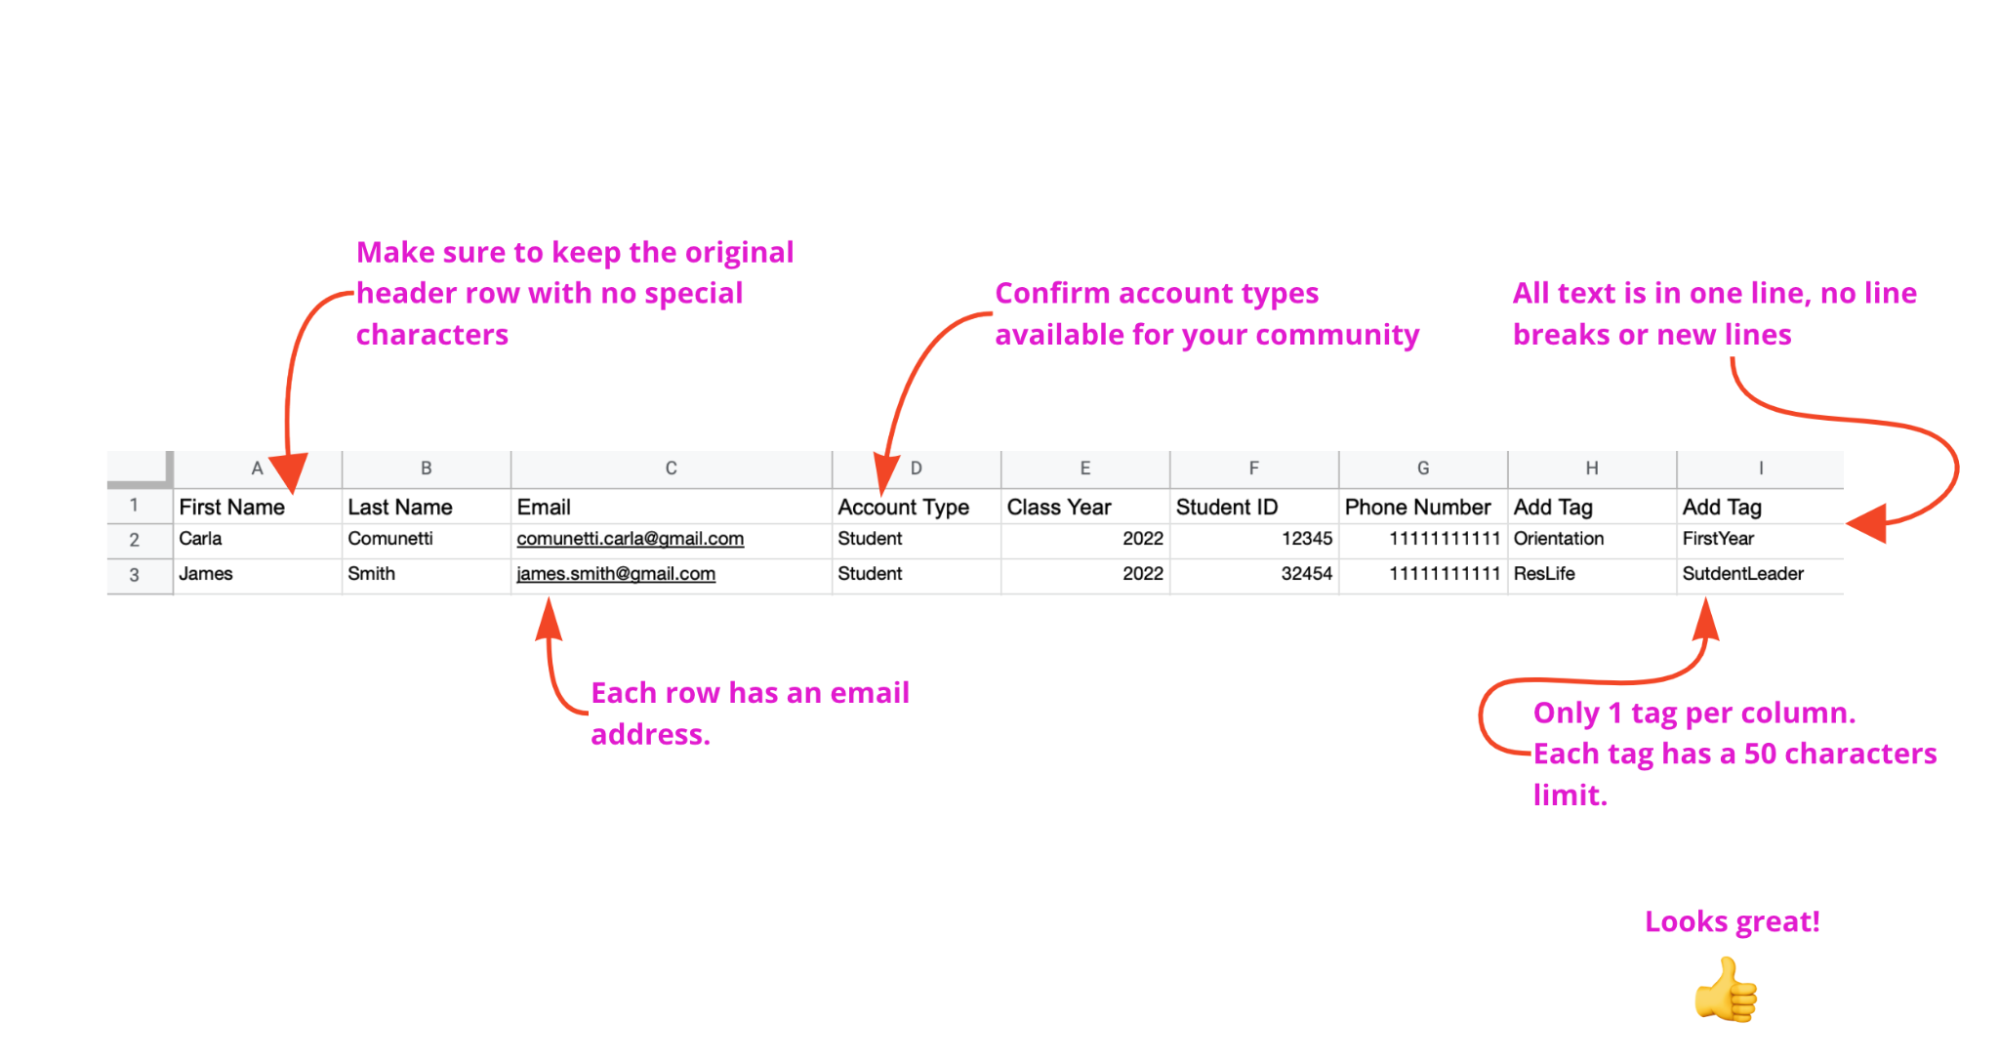
Formatting Rules for Admin Portal Data
When adding or updating data, be sure to follow the format rules to avoid upload issues.
- Keep the original header row (no special characters).
- Confirm that each row has a valid email address.
- Confirm that you are using the correct account types for your community (e.g. Student, Staff, Faculty).
- Keep all text in a single line (no line breaks).
- When uploading tags, only include one tag per column.
Was this article helpful?
That’s Great!
Thank you for your feedback
Sorry! We couldn't be helpful
Thank you for your feedback
Feedback sent
We appreciate your effort and will try to fix the article